The Walking Stick Memoriam #2; A White Gaucho Knot Is Next


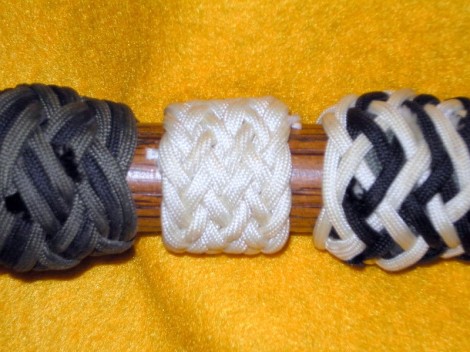
A white Gaucho knot adds looks and visibility.

A white Gaucho knot adds looks and visibility.

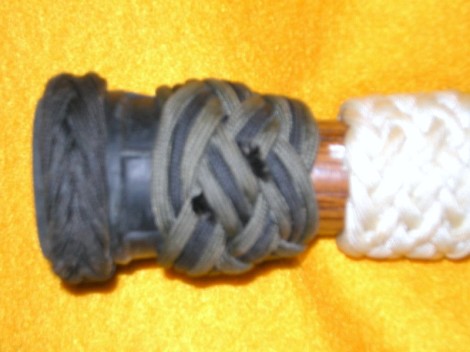
This is actually the third knot, counting up form the bottom. The Spanish Ring knot helps to hold on the rubber cane tip. This knot also has a secondary function other than looks. When I was first putting the knots on this cane, my thought was to put dark-colored knots towards the lower end — they wouldn’t show staining as quickly. Twice in one week I had people try to kick my stick out from under me because they hadn’t seen it in a crowded store. I went home after the second event and cut off the black Turk’s Head that was here and replaced it with this white knot. It solved the problem.

This knot is:

A Gaucho knot of 2 passes, tied in paracord. The count for the Leads and Bights are gone with the knot. For some reason I don’t have the slightest idea which knot I ended up putting here. After all the help it gave me over the years, it seems a shame I don’t recall it better.

Thank you for coming by my site. Come back again; the knots get more dramatic as you go higher up the walking stick:

William

Published in: on February 4, 2010 at 1:59 AM  Leave a Comment  
Tags: , , ,

The Walking Stick Memorium; A Look Back At Knots That Served Well, And Now Are Gone To Fiddler’s Green.


The first two knots on the Walking Stick Adventure.

The first two knots on the Walking Stick Adventure.

I was looking through some older pictures of my knotwork. These were taken with an older, less capable camera than the one I have now. My skills with the picture box were slighter, as well. To top it all off, these shots were taken as a reference tool for my use, never to be published. Now, faults and all, they are going to be seen around the world. This is in keeping with my plan to show those things which are less than perfect so I could profit by the instruction of others — and because this tuition would be via Internet, others could profit as well.

I started putting the knots on this cane in 1998. I added them one, or one set, as I got the time, materials, and became physically capable of doing it. The last of the knots were added in 2000. I realized that they were being asked to perform beyond their design limits — hell, beyond all reason and hope. Just before I slew them all with a sharp-edged instrument, I took these shots so I would know what was, and where it was. Many of these knots had 9 or 10 years of active service. The stains from using the stick to push aside obstacles I didn’t mind. It was when they started to fray and unravel I saw it was time to give them one last chance to participate in the high equinoctial ceremonies to “The Gods Of Ropes And Knots”. After that they were called to the front of the company, all hands being present. They were cited by name, rank, and occupational specialty. They were then paid off in full and given pre-paid passage to Fiddler’s Green — quarters there having already been arranged.

Memento Mori … all my friends here gathered … Memento Mori … all my enemies too far to reach … Memento Mori … watch close your time, for it surely comes to each …Momento Mori.

All the past now having been given its due, we start on today. The pictures are less than I would have preferred, but the subjects are gone beyond recall. I hadn’t planned to have a BLOG … so I surely hadn’t planned to use them on it. But many things have reminded me of late that it would be unfair not to give them the best I can. And so I call my friends to come and stand review one last time. I shall  select the best shots of each, and tell their story in the best light. Be kind to them, but not so kind as to lie. If you see a true fault — sing out, so all may benefit. After we have climbed the stick knot by knot, there will be an overall shot to draw it all together.

The knots used on this Walking Stick friend of mine were, starting at the left/bottom end of the cane:

The knot on the far left is a Spanish Ring knot of 2 passes. I now know the method which should be used to count the Leads and Bights on this knot. Unfortunately there is no way by which I can honestly do this. The picture is too fuzzy, so we miss on this one.

I can not tell by count the true nature of this knot, backed up by data. I can say that between my memory and the picture I believe it to be a Turk’s Head of 5 Leads X 4 Bights, tripled in paracord. Each pass got its own color; two of the green and the center one in black.

The first two mates are gone on to Fiddler’s Green, but not forgotten. They have now been seen, in effigy, by more people than ever saw them live …. Memento Mori.

Thank you for coming by my site. Come back tomorrow for the next memorial for those knots next highest on the stick:

William

Published in: on February 3, 2010 at 3:09 AM  Comments (2)  
Tags: , , , ,

Medicine Bottle # 45; A Turk’s Head Knot Adorns This Bottle Of Liniment.


Medicine Bottle #45; A Turk's Head knot graces this bottle.

Medicine Bottle #45; A Turk's Head knot graces this bottle.

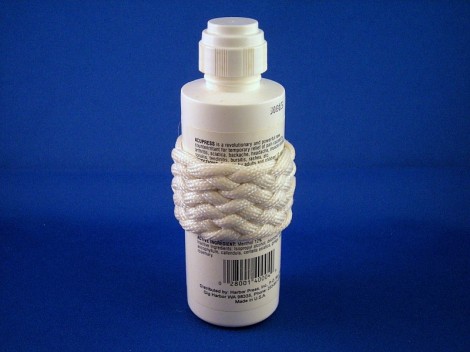
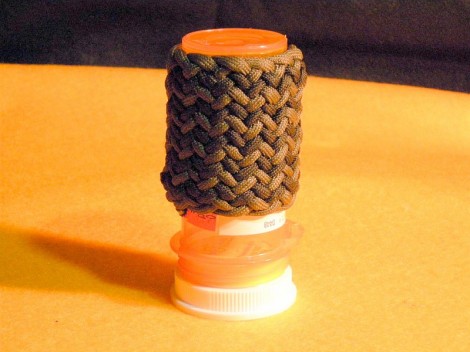
Medicine Bottle #45; A Turk’s Head seems to improve everything — of course this might be the knot version of having the prettiest grandchild in the world. I do have to admit that this bottle didn’t really need the knot. It stands taller than most and is easy to open. I just happened to see it when I had this knot in hand — it seemed a shame to waste it.

The knot on this bottle is:

This is a white paracord Turk’s Head. The count on this knot is 10 Leads X 9 Bights. I couldn’t make this knot as tight as I like to — the bottle is thin walled, and weak in the middle.

The real surprise for me here turned out to be the fact that even though I thought this bottle didn’t need a knot, it was improved by one. But the knot makes the bottle easier to use in some way I can’t figure out. It just makes it feel better in your hand. I’ll have to research this phenomenon and report to the ruling committee at a later time.

Thank you for dropping by my site. As always, I am open to any thoughtful suggestions on how I can improve my site, or my knots. Come back again; the parade of knots marches on:

William

Turk’s Head Knots Form The Head Of This Tassel Which Is Used As A Pull Cord.


Turk's Heads grace the head of a tassel -- making a fine pull cord.

Turk's Heads grace the head of a tassel -- making a fine pull cord.

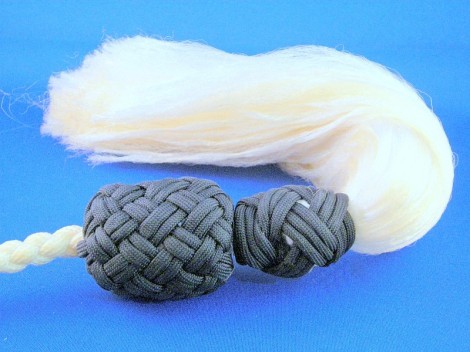
I am tasked with tying knots every day as a form of physical therapy. No matter how much you like knots, you start running short of new projects. One day I saw My Lady Rose trying to reach the door of a high cabinet, and was inspired to make a pull cord. That way she can at least open the cabinet and ensure the thing she wants is there before commencing the acrobatics of getting it down. Or calling for her tall person to get it for her. I’ll give you 2,438 guesses who that is — not that I mind. She just hates to impose on me. The end result is this pull cord.

The knots used in this project are:

I first took two lengths of a Kern-Mantle utility cord, and after middling them, I braided a 4 strand round sinnet. I put a constrictor knot on the ends to prevent unraveling. Below the constrictor I stripped off the outer covering and combed out the inner strands. Too thin of a bundle to make the tassel, but a start.

I then took several strands of the same cord and gutted them to get the core strands. I middled them and laid them alongside the braid so that the center was slightly above the constrictor knot, making sure they were evenly distributed around the core. I then seized them to the braid just above the knot with another constrictor knot.

Using a piece of the same utility cord, I made a 3 Lead X 4 Bight Turk’s Head to act as a mouse. After hanging the braid, I let the top strands fall down over the Turk’s Head and the inner strands. Just below the Turk’s Head I clapped on another constrictor knot. I now had a tassel with a small bulb-shaped head and uneven strands.

To dress the head of the Tassel I put on a Turk’s Head of 5 Leads X 3 Bights, tripled with black paracord. I left the weaves slightly open so that the head of the tassel peaked through.

I then combed out the strands and cut them off evenly. I thought I was done.

After some thought, I decided it needed a hand grip to take the strain, rather than letting it fall on the tassel. I then tied a series of unseen and unsung Turk’s Heads to mouse out the hand grip. The covering knot on the hand grip is a Turk’s Head of 9 Leads X 8 Bights, doubled in black paracord. Because this was to be the grab spot, I didn’t leave any exposed white strands. I haven’t the foggiest idea in all of Hades — how do you wash a tassel?

To give you some scale, the tails on the tassel are about 10″. The largest black Turk’s Head is 2″ tall, and about 1 3/4″ wide.

This pull cord had been giving yeoman’s service for about 11 years when the picture was taken. It is showing some wear, and some staining, but is still serving. In the passing years I have researched, and carefully considered, the problem of washing. It still has me baffled.

And now, a question for the scientists, philosophers, or really smart people in the audience. Why do the synthetics they make these cords out of attract some types of soil/stains. Could you by careful selection of fibers make an air filter which targeted specific pollutants?

Thank you for coming by my site. Come back again; I’ll try to keep things quick-stepping along the route of march:

William
Published in: on January 30, 2010 at 8:39 PM  Leave a Comment  
Tags: , , , ,

The Other, Larger Of Two Screwdrivers With Knot Enhanced Handles.


A large screwdriver with the handle much improved by stacked Turk's Head variants.

A large screwdriver with the handle much improved by stacked Turk's Head variants.

We live in world which is a marvel of mass-produced, affordable goods. As in all things, there are levels of quality available for differing levels of cost. The problem is they make things to fit the “average man” to get the most sales per unit of investment. What happens if you fall outside that average range in some way? All these marvels of the modern world don’t fit you. You can either spend astronomical sums buying custom made goods — or you can buy off the rack and customize them yourself. If you aren’t wealthy, or have a frugal streak, there is only one answer: buy off the rack and make them fit.

The knots used to make this screwdriver fit my hand are:

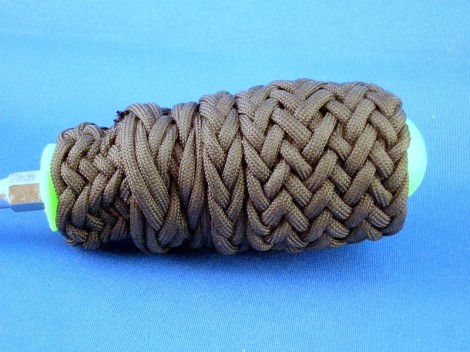
If you look at the picture at full size you will see it is made up of a stack of Turk’s Head variants. When I was clapping those knots on the handle I hadn’t even thought about a blog. I would try fit the handle and note where it didn’t fill my hand, add a knot in the worst spot, try fit, repeat til happy. Because of this I didn’t keep notes, so some of this is a best guess using an admittedly faulty system.

The handle at the start was about 1″ wide on the major part of the grip. After adding the knots it is just over 2″. The large knot that is on the butt/right end is a Gaucho knot of 2 passes, with 17 Leads X 15 Bights. Like all the knots on this project, it is done in black paracord. Paracord because it is very durable, and I keep reels of it. Black because it is on a work tool and black doesn’t show soiling or stains as much as other colors do.

Just to the left of the Gaucho knot is a Spanish Ring knot — the thinnest Gaucho knot as per Mr. Tom Hall. It is there to smooth out the bump where the edge of the large Gaucho knot ended. The step down to the next lower knot was too abrupt to give a comfortable grip.

If memory, prompted by that part of the knot I can see, serves me, the knot beneath those already named is a Turk’s Head. I think it has 13 Leads X 4 Bights, doubled.

Beneath all these, and visible as the last knot at the left end of the grip, is a Herringbone knot. It has 12 Bights on the exposed end. The count of the Leads is lost under the other knots. It served to fill in a dip in the original grip, and to add size and increased friction on that edge of the handle.

I seem to recall there being another small knot under there somewhere, to even out the profile of the grip. What that knot is will be left as an exercise for the reader.

The end shape, with a taper going from just over 1″ to just over 2″ is nearly perfect for my hands. I can put a lot more torque into the fastener than I could with the factory grip. It is also much easier for my battered and dinged up hands to hold.

Thank you for coming by my site. I appreciate your visits, and any comments you care to leave. Come back again; I don’t post every day, but I try to put something up often enough so most of your visits will be rewarded:

William

Medicine Bottle # 44; Graced With A Novel Herringbone Knot, With The Bights Worked To Form A Straight Line


Medicine Bottle #44; a straight edged Herringbone knot.

Medicine Bottle #44; a straight edged Herringbone knot.

Medicine Bottle #44; the next piece from the “Medicine Bottle Collection”. I am always trying to learn, or create, different variations for the knots I know, or new knots. Sometimes the variations change a knot so much that it may deserve to be called a new knot. This may be one of those times. What do you think about this?

The knot on this bottle is:

I was using the “Monkey Method” of knot tying, trying for something novel to clap onto a bottle to make it stand out at the Bottle family bedside reunion. I used white paracord because this was for one of the medicines I had to take at 0-dark-thirty. The basic knot is a Herringbone, of 14 Leads X 12 Bights. I worked the rims in the way used on the “Colima Lazy Man’s Knot” in Grant’s book. It not only gave the familiar straight edge, which is the defining characteristic of these knots, but also gave a new alternating short and long pattern where the bights turn back into the knot. I think this makes a very handsome knot.

The straight edges on some knots solve a few of the problems you face when planning/fulfilling a project. You can butt up to a hard structure with minimal gap, either visual or physical. You can also tie two straight-edged knots hard against each other with none of the core showing. This also gives a more even profile to a stack of knots. It is a good thing to have in your kit for those times you need it.

Thank you for coming by my site. Come back again. I do appreciate your visits:

William

Medicine Bottle # 43; A Bi-colored Pineapple Variant Covers Two Inches Of This 4″ Bottle.


Medicine Bottle #43; covered by a bi-colored, 2" long Pineapple knot variation.

Medicine Bottle #43; covered by a bi-colored, 2" long Pineapple knot variation.

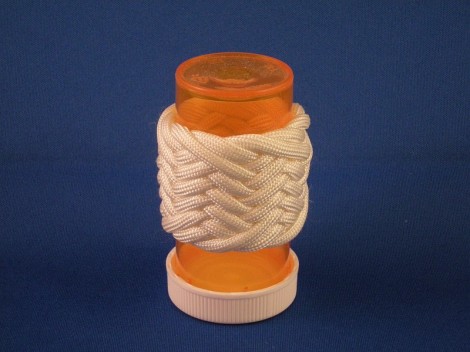
Medicine Bottle #43; Back to the more normal prescription medicine bottles. This bottle is about 4″ overall; the knot covers just barely over 2″ of that. This knot didn’t increase the diameter too much, but it did make it much easier to open.

The knot on this bottle is:

This knot has my PPA (Phony Patent Pending) edge treatment. By stopping short of the edge bights of the knot by one crossing, a bolder border is formed. Particularly if two different colored knots abut one another, this makes for a more well-defined edge between them. Besides, this is the look that My Lady Rose likes.

The base knot in this interweave is a Turk’s Head of 13 Leads X 12 Bights, in green and black paracord. I always wondered how one specified the structure of a Herringbone or Pineapple knot. Last year I bought Tom Hall’s excellent work on the Turk’s Head and some of its variants. Now I know that I should give the total counted Leads and Bights, as well as which type of knot it is. As near as I can puzzle out, by his system this knot would be: a Pineapple knot of 2 passes, with an edge type of 2-2, with a total of 23 Leads X 25 Bights.

There is a saying around this part of the country: I don’t know much, and I don’t understand all I know. That about sums up me and my relationship to some of these knots.

If I am just tying whichever knot pops to mind and choosing whether or not to insinuate an interweave with its structure later, I call that “The Monkey Method Of Tying Knots”. I am quite capable of tying a knot which I can only roughly name. Trying to eliminate that hole in my knowledge of knots is taking some work, more work than actually cranking out the knots. I persevere, but progress only slowly — if I were a boat I would be a barge: slow, slab-sided and ungainly, without is own power source or steering gear, blundering along and going as much where the current goes as where I wish.

Thank you for coming by my site. I greatly appreciate your visits. If you have any ideas on how I can improve either my knots, or my site, sing out. That is the only way I will learn, and is the real reason I am here:

William