The Walking Stick Memoriam # 05: 1 Spanish Ring Knot, And 2 Turk’s Heads Used To Dress The Ends Of Other Knots.


The Walking Stick Post #5, A Spanish Ring knot and 2 Turk's Head knots.

The Walking Stick Post #5, A Spanish Ring knot and 2 Turk's Head knots.

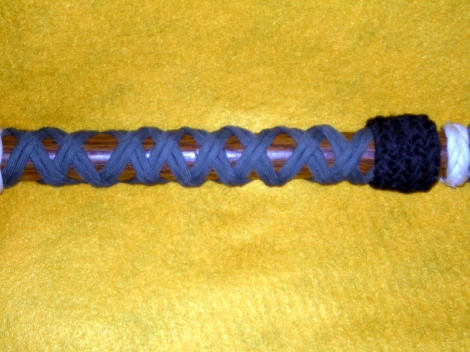
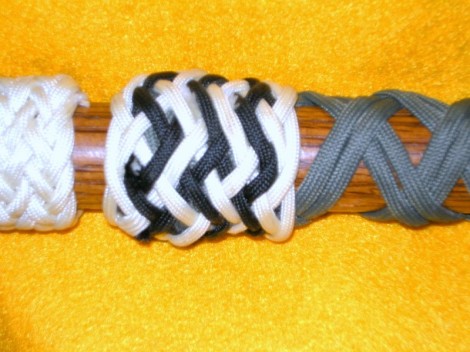
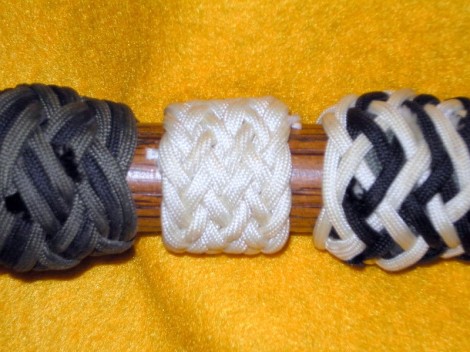
The knot on the left in this picture is dressing the end of the 11 Lead X 2 Bight Turk’s Head in Stick post #4. Like most of my knots, it is tied in paracord, this time in black. I don’t remember and can’t puzzle out the Leads and Bights on this Gaucho knot. It must have been somewhere in the 28 thru 32 Bight and maybe 15 thru 17 Lead — either the picture or my eyes are too fuzzy to clarify this any further. Originally this knot was a little better formed than the picture shows, but wear and reworking have tightened it out of shape.

The center knot is done in white utility cord and is a Spanish Ring knot. Just guessing, it was probably based on a 3 Lead X 7 Bight Turk’s Head before the interweave. The ends have started to pull out and fray — this was one of the knots that convinced me that it was time for surgery.

The knot on the right is a Gaucho interweave done in greenish paracord. I am either having a hard day or these pictures are fuzzier than the others in this set. Again, I can’t make out the count on this knot, and my memory is duller than my sight.

You can see the wood between the knots. This is because of the aesthetic influence of My Lady Rose. I’m kind of getting used to it now. In my early days of learning to knot, painted coachwhipping was used to cover the entire rail. It took the place of other finishes and so had to provide protection from the sea — as well as a firm hand-hold and/or any improvement in looks it provided. Now that I live inland, it isn’t necessary to be so thorough in providing extensive protection — everything but the oil finish is for looks.

Thank you for coming by my site. We are now about half way up the stick and still climbing. Come back again; some of the better knots lie ahead.

Yours:

William
The Next Post In The Growing Tale Of Making Orthodox Style Prayer Ropes Using Sailor’s Knife Lanyard Knots


Both my link checking, and some of my readers, have prompted me to interrupt the posts on walking sticks with this public service announcement.

The link to the page at the “Semantron” blog for the downloadable PDF file is dead. This is the only tutorial for the “one-handed cat’s cradle” method of tying the knots for an Orthodox Church style prayer rope which I have found. Rather than let this document disappear into the void I am posting a copy for download from my site. Please note that I did not make this tutorial and claim neither authorship nor ownership. I will attempt to contact the author by E-Mail and get his permission to leave this file here for download — or at the very least see if he is going to activate a live link to the file.

I will confess to being surprised by the interest level in this chain of posts. The coincidence of the knots being of the same structure as the Sailor’s Knife Lanyard knot is a little esoteric for most people, so I must assume there is a high level of interest in making prayer ropes and their kin. A quick Google will reap a collection of links to sites which show how to make knotted rosaries similar to those used by the Roman Catholic Church. Most of them employ some version of the Multiple Overhand knot to make the bead substitutes. Many of these appear to be made for personal use, but many are also made for distribution to the public or to US armed services members, particularly those stationed in forward areas overseas.

I have to admit that the Multiple Overhand knots would be quicker and easier — myself, I would prefer to invest the additional effort needed to make them with the Sailor’s Knife Lanyard knots.

A very short prayer cord to show the use of the Sailor's Knife Lanyard knot.

A very short prayer cord to show the use of the Sailor's Knife Lanyard knot.

The short sample in this photo, which was made in paracord, convinced me of that. If this was made out of a smaller diameter cord, with the knots spaced out for easier counting off, it would be a fine specimen. It is structurally sound, clean lined and, to my eye, handsome. You do have to remember that my aesthetic views on knotwork were formed while hanging around boats ranging from commercial fishing craft to classic wooden sailboats. I also grew up with a romantic longing for the sea in the days of the square riggers. Like most romantic views it was unrealistic. One trip around the horn, or even having to do my favorite decorative knots under the eye of a bully bosun’s mate with a ready belaying pin in hand would have cured everything.

I finally found what I believe to be the original video tutorial which provided the material for the mash-up that started this trip. You can go to the original site here. I would suggest you read the page under the links to the videos as well, since it has some additional hints. This is undoubtedly the original material — the now extinct mash-up did not improve the lessons. This tutorial is more instructive, even though it is an amateur production, and the larger file size is spent on things that make it easier to follow.

I would not be surprised if you had to use the video and its containing page AND the PDF download to make the knots by the one-handed cat’s cradle technique. I find the sailor’s in-hand method much faster and easier, but that may be because it is the way I have tied these knots for years.

The links to the previous posts on this subject are below, oldest on top, and please remember some of the links are dead:

Thank you for stopping by my site, and a special thanks to those of you who have returned to follow this chain of posts. Come back again; the parade of knots is starting to line up nicely.

Yours:

William

The Walking Stick Memoriam #04: An 11 Part X 2 Bight Turk’s Head Knot Done In An Open Weave


An 11 Part X 2 Bight Turk's Head knot on a walking stick.

An 11 Part X 2 Bight Turk's Head knot on a walking stick.

After my involuntary break in blogging, I am finding it hard to get back up to speed …. bear with me and I’ll try to get the parade back in step.

As we move further up the stick, you will notice that the knots are in better shape. This is a matter of wear and tear, rather than order of application. The knots on the bottom of the stick are used for things like pushing brush aside.

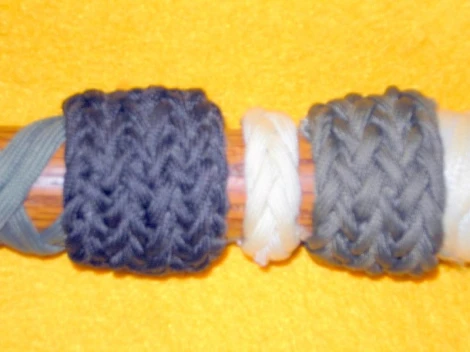
My Lady Rose likes the look of knots done with an open weave. Before I met her, if left to my own devices, things tended to accrue knots until they looked like they had suffered the fabled sea change – you could not see the original surface for the knots. She has converted me to some degree, although I still tend to use more knots than weave unless it is something I am making for her.

This knot is done after the fashion of the “2 Bight Turk’s Head of any length” from Grant’s book; the only change being that it is spread out over a longer distance than a tightly made knot would cover. You do have to use a seizing of some sort to hold it open while you cover the ends with some other knot. The knot on the left/lower end I explained in my last post on the stick (# 3). The black knot on the other end will be covered in my next post. The distance between the two knots that dress the ends was about 14″.

Close view of an 11 x 2 Turk's Head knot.

Close view of an 11 Part X 2 Bight Turk's Head on a walking stick.

If you look at the finish on the wood, the highlights which show are the original finish. When this picture was taken it had about 13 or 14 years of use accrued. For something that was used often, and sometimes roughly, that is remarkable endurance. The finish is of hand-rubbed Tung oil  – I learned to do this many years ago when I was hanging around with people who owned classic wooden sailboats. It is still one of my favorite finishes for things made of wood – partially for utility. but largely because I like the look of wood and brass/bronze on those old boats.

Thank you for visiting my site, and also an extra thanks for those of you who have stuck through my absence. Come back again; the parade is still in the marshaling yard, but is forming up nicely. The march will start off slow and build up, but it is coming.

Yours:
William
Published in: on September 5, 2010 at 11:47 PM  Leave a Comment  
Tags: , , ,

The Walking Stick Memoriam #3; A Pineapple Knot In Two Colors Of Paracord


A bi-color Pineapple knot is next.

A bi-color Pineapple knot is next.

This knot dresses the bottom end of a length of 2 Bight Turk’s Head which was done in an open weave. It is also a remeinder of the time when I was just learning to put interweaves on my Turk’s Head knots. Today I probably wouldn’t leave this knot on a walking stick for the world to see. At the time, it was near the top of my knotting skills. I’m sure if I’m still alive in another 15 years, I’ll say the same about the pictures I’m taking today. Of course, it could be much worse — if you practice a skill for 10 or 15 years and you didn’t get better that would be much worse.

The knot of today’s post is:

This is a bi-colored Pineapple knot. If I remeber correctly, and I wouldn’t bet the farm on it, the base knot in white paracord was of 9 Leads X 8 Bights. The intereave was done with the wider visual border created by stopping the weave one crossing short of the standard Pineapple knot. Using Tom Hall’s nomenclature, as near as I can figure it, this would have a 2–2 structure.

To the right of this knot you can see the start of the next. My Lady Rose likes the look of a more open weave. Both of these knots exhibit this nature, the next more so than this.

Thank you for dropping by my site. If you know of any way by which I could improve either my site, or my knots, sing out. I would like to hear from you. Come back again; I’ll work my way up the walking stick:

William

Published in: on February 10, 2010 at 12:49 AM  Leave a Comment  
Tags: , , ,

The Walking Stick Memoriam #2; A White Gaucho Knot Is Next


A white Gaucho knot adds looks and visibility.

A white Gaucho knot adds looks and visibility.

This is actually the third knot, counting up form the bottom. The Spanish Ring knot helps to hold on the rubber cane tip. This knot also has a secondary function other than looks. When I was first putting the knots on this cane, my thought was to put dark-colored knots towards the lower end — they wouldn’t show staining as quickly. Twice in one week I had people try to kick my stick out from under me because they hadn’t seen it in a crowded store. I went home after the second event and cut off the black Turk’s Head that was here and replaced it with this white knot. It solved the problem.

This knot is:

A Gaucho knot of 2 passes, tied in paracord. The count for the Leads and Bights are gone with the knot. For some reason I don’t have the slightest idea which knot I ended up putting here. After all the help it gave me over the years, it seems a shame I don’t recall it better.

Thank you for coming by my site. Come back again; the knots get more dramatic as you go higher up the walking stick:

William

Published in: on February 4, 2010 at 1:59 AM  Leave a Comment  
Tags: , , ,

Medicine Bottle # 45; A Turk’s Head Knot Adorns This Bottle Of Liniment.


Medicine Bottle #45; A Turk's Head knot graces this bottle.

Medicine Bottle #45; A Turk's Head knot graces this bottle.

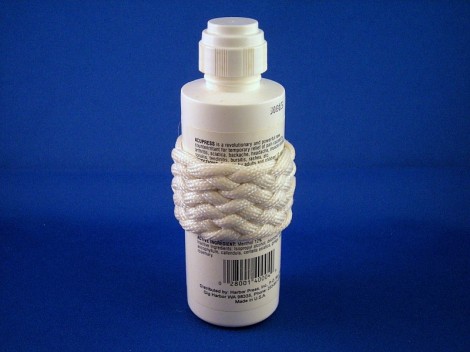
Medicine Bottle #45; A Turk’s Head seems to improve everything — of course this might be the knot version of having the prettiest grandchild in the world. I do have to admit that this bottle didn’t really need the knot. It stands taller than most and is easy to open. I just happened to see it when I had this knot in hand — it seemed a shame to waste it.

The knot on this bottle is:

This is a white paracord Turk’s Head. The count on this knot is 10 Leads X 9 Bights. I couldn’t make this knot as tight as I like to — the bottle is thin walled, and weak in the middle.

The real surprise for me here turned out to be the fact that even though I thought this bottle didn’t need a knot, it was improved by one. But the knot makes the bottle easier to use in some way I can’t figure out. It just makes it feel better in your hand. I’ll have to research this phenomenon and report to the ruling committee at a later time.

Thank you for dropping by my site. As always, I am open to any thoughtful suggestions on how I can improve my site, or my knots. Come back again; the parade of knots marches on:

William

Turk’s Head Knots Form The Head Of This Tassel Which Is Used As A Pull Cord.


Turk's Heads grace the head of a tassel -- making a fine pull cord.

Turk's Heads grace the head of a tassel -- making a fine pull cord.

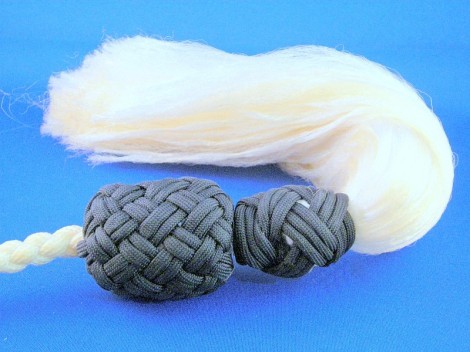
I am tasked with tying knots every day as a form of physical therapy. No matter how much you like knots, you start running short of new projects. One day I saw My Lady Rose trying to reach the door of a high cabinet, and was inspired to make a pull cord. That way she can at least open the cabinet and ensure the thing she wants is there before commencing the acrobatics of getting it down. Or calling for her tall person to get it for her. I’ll give you 2,438 guesses who that is — not that I mind. She just hates to impose on me. The end result is this pull cord.

The knots used in this project are:

I first took two lengths of a Kern-Mantle utility cord, and after middling them, I braided a 4 strand round sinnet. I put a constrictor knot on the ends to prevent unraveling. Below the constrictor I stripped off the outer covering and combed out the inner strands. Too thin of a bundle to make the tassel, but a start.

I then took several strands of the same cord and gutted them to get the core strands. I middled them and laid them alongside the braid so that the center was slightly above the constrictor knot, making sure they were evenly distributed around the core. I then seized them to the braid just above the knot with another constrictor knot.

Using a piece of the same utility cord, I made a 3 Lead X 4 Bight Turk’s Head to act as a mouse. After hanging the braid, I let the top strands fall down over the Turk’s Head and the inner strands. Just below the Turk’s Head I clapped on another constrictor knot. I now had a tassel with a small bulb-shaped head and uneven strands.

To dress the head of the Tassel I put on a Turk’s Head of 5 Leads X 3 Bights, tripled with black paracord. I left the weaves slightly open so that the head of the tassel peaked through.

I then combed out the strands and cut them off evenly. I thought I was done.

After some thought, I decided it needed a hand grip to take the strain, rather than letting it fall on the tassel. I then tied a series of unseen and unsung Turk’s Heads to mouse out the hand grip. The covering knot on the hand grip is a Turk’s Head of 9 Leads X 8 Bights, doubled in black paracord. Because this was to be the grab spot, I didn’t leave any exposed white strands. I haven’t the foggiest idea in all of Hades — how do you wash a tassel?

To give you some scale, the tails on the tassel are about 10″. The largest black Turk’s Head is 2″ tall, and about 1 3/4″ wide.

This pull cord had been giving yeoman’s service for about 11 years when the picture was taken. It is showing some wear, and some staining, but is still serving. In the passing years I have researched, and carefully considered, the problem of washing. It still has me baffled.

And now, a question for the scientists, philosophers, or really smart people in the audience. Why do the synthetics they make these cords out of attract some types of soil/stains. Could you by careful selection of fibers make an air filter which targeted specific pollutants?

Thank you for coming by my site. Come back again; I’ll try to keep things quick-stepping along the route of march:

William

Published in: on January 30, 2010 at 8:39 PM  Leave a Comment  
Tags: , , , ,